Pages

Thursday, February 21, 2013

Cranberry Maple Bars


I love making bar cookies.  You can have a whole pan full ready in no time and there's no cookie cutters involved or dropping by spoonfuls...just bake in the pan and cut when cooled.  When I'm asked to bring a dessert to an event, I usually bake bars.

This recipe is based on one from an outdoor cooking Dutch oven dessert contest.  There were some specifics missing from the recipe, so I reworked the recipe...cut some ingredients in half and increased others, added maple syrup instead of extract.  I love the mapley flavor of the bars and the glaze.  It is a nice change of pace from chocolate.  I did not add nuts but if you are a nutty cook, add away!  I'm sure you, your family and friends will love these bars.

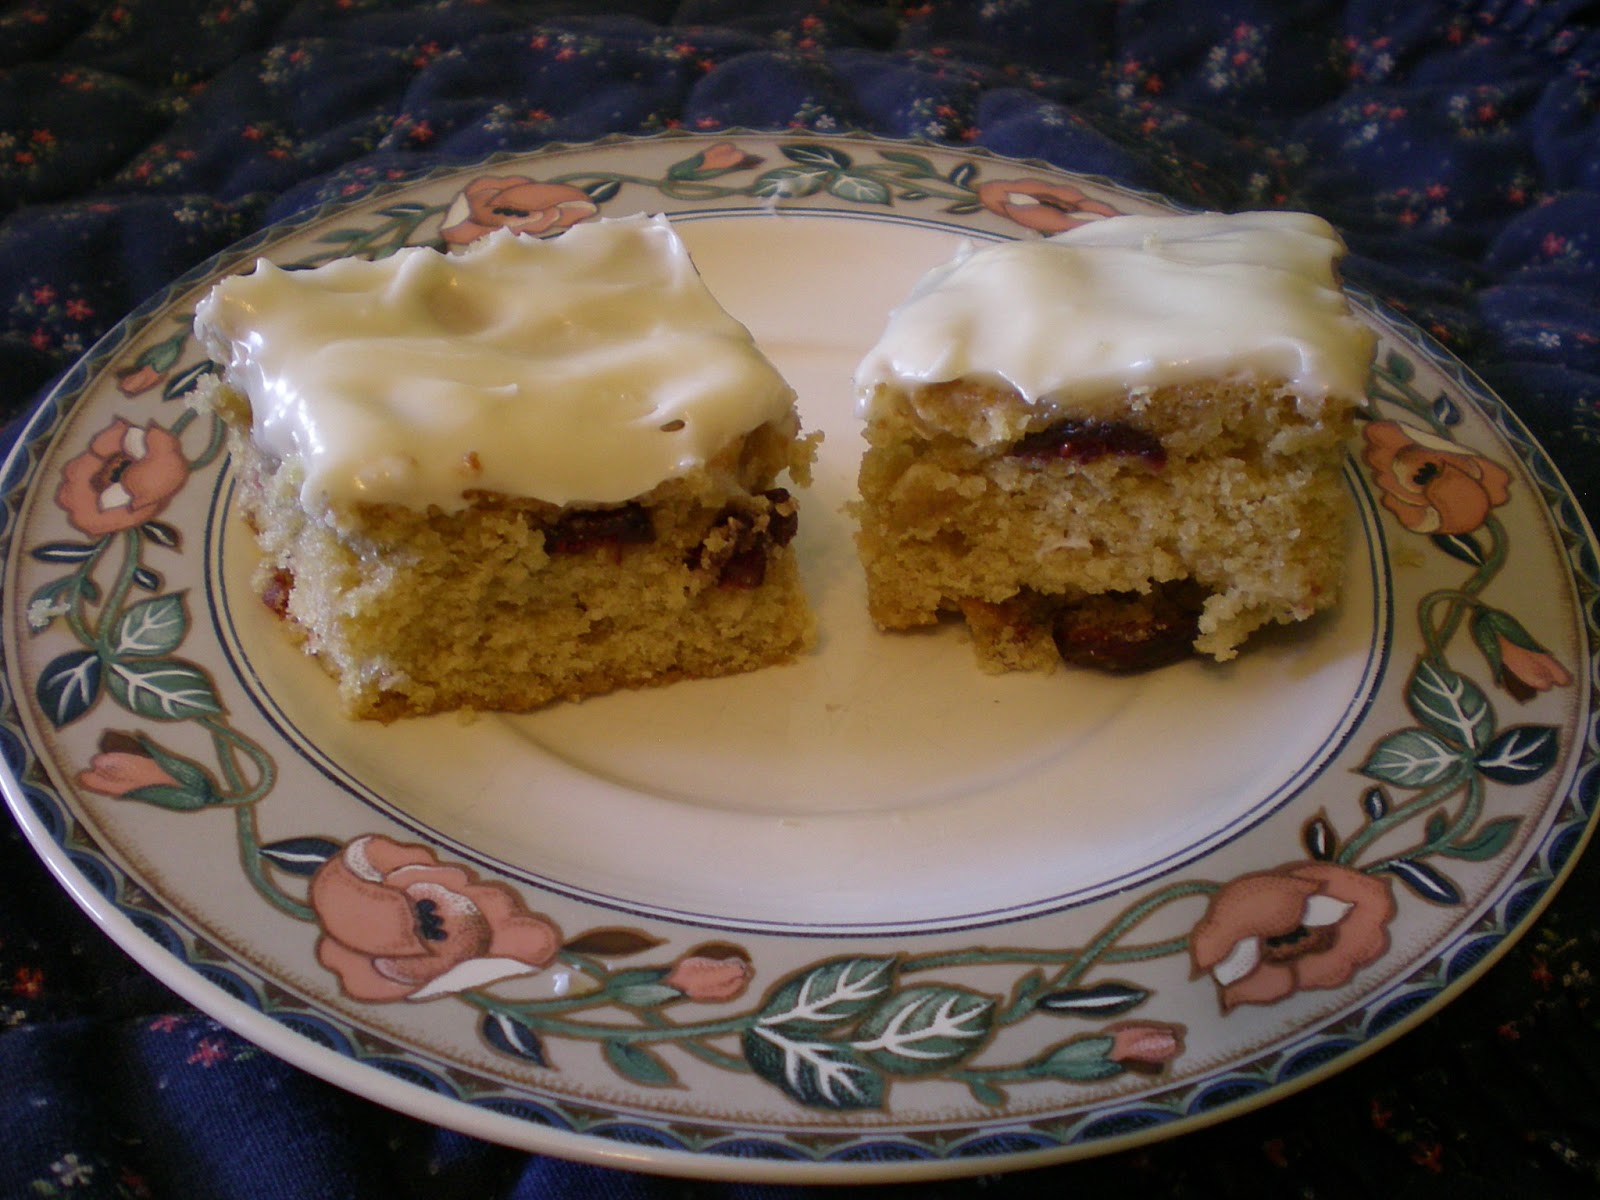
Cranberry Maple Brownies

3/4 cup butter, softened
1 1/2 cup brown sugar
3 eggs
1 tsp vanilla
1/4 cup maple syrup
2 cups flour
1/2 tsp salt
1 tsp baking powder
1/2 cup dried cranberries

Glaze
2 Tbls cream cheese, softened
1 Tbl butter, softened
3/4 cup powdered sugar, sifted
1 Tbl maple syrup


In mixing bowl, cream butter and brown sugar until light and fluffy.  Gradually add eggs one at a time, mixing well and scraping down bowl sides between each addition.  Add vanilla and maple syrup and blend well.


Measure flour into a mixing bowl and blend in salt and baking powder, stirring well.  Gradually add to butter sugar mixture, combining well after each addition.  Hand mix the cranberries into the batter with a spatula.  Lick spatula...rinse spatula.


Prepare 9 x 13 pan by greasing or using parchment paper  (I like to use parchment paper because it makes it much easier to get the bars out in one piece).  Spread batter in pan using a spatula, being careful not to pull the paper up.


 Place in 350 degree oven and bake for 25-28 minutes, until toothpick comes out clean.  Don't overbake.  Allow to cool competely.  Mix glaze ingredients until smooth and frost top.


See how simple it is to get them on the table?  The guys started grabbing these almost as soon as I got them frosted.  I would add 1/4 cup more cranberries next time as I am a cranberry lover.


Homestead Barn Hop
                

Wednesday, February 20, 2013

Are Turkeys Really Stupid Enough to Stand in the Rain and Drown?


I had considered having poultry for many years before actually getting them.  Several books I read said turkeys were not a good choice for the small farm because they were difficult to raise, required special accommodations and were actually too stupid to come in out of the rain.  They would look up at the sky, wondering what that strange thing was hitting them in the head...and drown.   "The Homesteader's Handbook to Raising Small Livestock" published by Rodale Press in 1974 starts the turkey section with this...

A Dickens to Raise
"Of all homestead poultry projects, turkey-raising seems to appeal to the least number of people.  Turkeys are among the most difficult domestic fowl to raise.  They are amazingly stupid - from the newly hatched poults who can starve to death while trampling in their feed because they haven't learned where to find it, to the hens who lay their eggs standing up.  They are easily frightened.  And turkeys are much more susceptible to disease than other fowl are."

"Five Acres and Independence" has this to say about turkey raising...

"Turkeys, unless reared by modern methods, are the most disappointing perhaps of all poultry to raise because the poults are delicate.  The turkey hen  is the worst fool of a mother imagineable.  Unless she is confined in the morning and during rainy weather, she will lead her brood through wet grass with the results that they get chilled and so weakened that many, if not all of them die.  Then too, the young turks are subject to diseases that are highly fatal.  So turkey raising, although highly profitable to the specialist and the raisers of large flocks under modern methods, is a branch of poultry raising advisable for the small farmer to avoid."

The large book "Country Wisdom & Know-How -  Everything You Need to Know to Live off the Land"  doesn't even mention turkeys at all!


Wow!  No wonder I never even considered raising turkeys!  When the friend who ordered my chicks showed up, she told me "Oh and I threw in 6 turkeys too", I thought "hmm, well, we will see how it goes".  I was really expecting the worst.  But the only problem I had with the poults was a result of typical turkey behavior...turkeys are very curious and will find ways to get into trouble.  My friend left the feedbag in the brooder house...and the next morning, I found one poult stuck IN the bag and another trussed up with the bag string...wrapped around its legs.  I have no idea how the poult accomplished that feat.


I found the poults no more difficult to raise than the chicks.  I did eventually separate them, as turkeys have differing nutritional needs than chickens.  I only had ONE problem with these first turkeys...one tom broke it's leg shortly before butchering time.  These were Broad Breasted turkeys and their bodies literally outgrow the skeleton.

I acquired heritage type turkeys next and let three hens lay, set on and raise their own poults.  They were fantastic mothers and kept perfect care of them, not losing a one.  They raised them in an outdoor pen in March when the temperatures at night were in the low 40's.  I was amazed that these little poults, that have to be kept in 90-95 degrees in a brooder, were walking around in such low temperatures.  But mom was right there to cover them every few minutes or so to warm them up.


As far as the old "farmer's tale" of turkeys being so stupid, they drown in the rain, that is utter nonsense as well as anatomically impossible.  Turkeys are very curious, as I mentioned.  This can get them into trouble at times.  It does not mean they are stupid.  If you listen and understand their various vocalizations, you can begin to see what they are doing and why.  The turkey's nostril is more of a slit than a hole.  Above it is a bony structure that partially covers the opening from above.  There is no practical way for rain to enter the nostril and certainly not enough to drown a bird!  


Every time it rains, my birds do not stand around looking up wondering what that wet stuff is!  They take cover under a tarp and stay there until it stops!  


I am glad I did not listen to the so-called 'experts' or let them dissuade me from raising turkeys.  Turkeys are valuable watch birds...they spot things in the sky long before the chickens do and will give an alert for  the others.  My chickens have learned to listen to them! I have found them to be much calmer and friendlier than my chickens and so much fun to have around.  Each one has a distinct personality.  I provide what they need in terms of food and shelter and they provide me with healthy homegrown meat, eggs, hatching eggs, and poults.  These ones pictured are now pets and I love hearing their greetings in the morning.  I am quite enamored with turkeys and will never be without them.


You have a goodie for me??


Sunday, February 17, 2013

A First Look at Alpacas!

I happened to come across an advertisement in the local newspaper that the Southwest Regional Alpaca Show was coming to Norco, Calif., just 10 minutes away.  I've only seen pictures of these lovely creatures on Facebook.  Wouldn't it be great to see them in person?  What better way to learn about an animal I've only seen online than go to a show where there are hundreds, as well as people who are passionate about them.  I made plans and marked my calendar for what would surely be a fun and educational time.


 Norco, California calls itself "Horsetown USA" and for good reason.  There are more horses than people in this city of 27,000.  Being right smack dab in the middle of So. California suburbia, the town prides itself in mandating that all home lots must be large enough for animal keeping, with a 'minimum' of 1/2 acre.  There are even folks in Norco who raise camels and it is not an unusual sight to see them being led on the side of main street or in parades.  Don't even think about moving here if you are bothered by animal smells or sounds.  All commercial buildings must have a Western themed front and receive a thumbs up from an architectural committee before being built.  All streets have horse trails instead of sidewalks.  They even outlawed planting oleander bushes (a common plant) because it is toxic to horses.  They really look out for their horses here.


The event was held at the new George Ingalls Equestrian Events Center, a state of the art facility for horse and other animal shows.  Lots of bleacher space to sit and watch the judging in the ring.  It was very comfortable inside, even with 80 degree heat outside.  (I was told alpacas don't pant when heat stressed)  Lots of fun vendors and alpaca fiber items to ooh and aah over.  I took advantage of this and purchased fingerless gloves while I was there  (now I can type when my hands are cold...yay!).


Judging was ongoing throughout the day and I loved that the judge used a microphone to evaluate each animal and explain why she placed them 1st, 2nd, 3rd.   I took a few hours to talk with breeders (there were dozens, coming from as far away as Arizona, Utah, and Oregon)  I have never seen or felt an alpaca and I had the opportunity to do both, as well as handle sheared fleece.  So soft and not itchy like wool, which I can't wear!  I found most breeders were more than happy to share about alpacas, and their animals in particular.  I had so many questions - what do they eat?  what vaccinations do they need?  what are health and care concerns?   how long are they pregnant?  how often do you shear?  I heard over and over that these beautiful animals are easy to keep.


There were hundreds of alpacas at this show in an array of colors.  I think the most beautiful were the greys, especially one girl who was a rose grey.  This is a silver grey showing off his blue ribbon.


I am completely new to alpacas and I learned some interesting things about them.  They are members of the Camelid family (think camels in Asia and Africa) and are native to South America, where they are used for their fleece and as pack animals.  They are very intelligent, gentle, well-mannered and clean animals.  They come in two breed types:  huacaya (wah-KI-ya) and suri (surrey).  Huacaya fleece has crimp (waviness) and makes a wonderfully soft yarn.  Huacaya look like big teddy bears.  Suris have no crimp and the fiber forms what looks like mini dreadlocks.  Suri fleece somewhat resembles human hair and is sold to doll makers.  The fleece is sheared once a year. 

Alpacas make a cute humming sound and the cuteness factor is off the chart!  The females are induced ovulators like rabbits - the act of mating brings on ovulation (no heat!).  They are pregnant for around 11 months and usually have just one baby called a cria that weighs around 15-20 pounds when born.  They live for around 18-20 years.  Alpacas are herd animals and do not do well alone.


Alpacas are considerably smaller than llamas...around 125-200 lbs compared to around 400 lbs for llamas.  Enclosures and fencing must be well thought out as they are defenseless against predators.  Alpacas have two toes on their feet and are easy on the land because the foot is padded.  The droppings are pellet-like and they will pick one location where they all go to the bathroom. (what a bonus!)  The droppings are low in odor and nitrates and make a great compost for the garden.  Alpacas sound like a wonderful "green" livestock to have on a farm.

I think I was most surprised to find that alpacas only have two front teeth on the bottom and no front teeth on the top - just a hard palate.  They snip off the hay and grind it with their back teeth.  The intact males will grow fighting teeth!  They also rarely spit at people and mostly do it as a means of defense when provoked.  I also learned what a berserk male is...an intact male that is too friendly and doesn't respect space.  They will try to knock you down and breed you.  (alpacas breed lying down)  No intact males for me!


And the fleece!  It comes in around 22 natural colors and is soft and luxurious!  I felt no 'prickling' like I do with sheep wool.  It has no lanolin in it that needs to be washed out.  Several breeders proudly parted the fleece with their fingers to show me the depth (4" or more) and how it crimps.  Reminded me of my hair in the 80's <grin>.  I really enjoyed watching a group of gals doing a spinning demo,  magically transforming the fleece into yarn.  I was told that as males age, hormones affect the quality of their fleece.  Gelded males will keep the youthful quality of the fleece and make a good herd kept just for that purpose.

I thoroughly enjoyed my morning at the Alpaca show and received invitations to tour farms near me.  Going to an animal show is a great way to be introduced to a new livestock breed and make connections for further investigation.  You can see the animals and talk to breeders about how to raise them, as well as the benefits of having them on your farm.  I am enamored with alpacas and look forward to learning more about them, as well as possibly having some for my farm.


Thursday, February 14, 2013

Bacon Cups!   or   Sometimes Recipes Lie!


You know how the recipe picture looks like this.....


But it turns out like this...


Here's a big secret to being a great cook..... always try out a recipe first before making it for others....because sometimes RECIPES LIE!!!  Seriously.   


Sometimes, no matter how well you read the directions, no matter how closely you pay attention,  you get a Great Big FAIL.  But thankfully, this was just a small fail.

Now, it wasn't really my fault.  Nope, nothing at all.   You see, the recipe said NOTHING about using a LARGE muffin pan.   And being the naive bacon cup maker that I was, I used a REGULAR muffin pan, expecting to get the nice, lovely picturesque cups.  Wasn't gonna happen...not a big enough upside down cup to put more than one strip around the sides. 

By the time I realized this dilemma, my fingers were already full of bacony goo.  (note to bacon cup makers - if you want to take pictures as you make these, be sure to have a plastic bag handy to stick your hand in so your camera will not also be full of bacony goo)  I really didn't want to rummage through the pantry looking for the LARGE muffin pan...so I soldiered on.  I mean, I had a very hungry hubby wanting his promised *Special Valentine's Day Breakfast* (which I foolishly had announced ahead of time).  What was I to do???   I was determined to make it work.


First step is to turn the muffin pan upside down on a larger cooking pan.  This step is VERY important as there will be grease...and you should save this lovely grease for some other devious thing like gravy...NOT have it splattered all over your oven which could lead to unpleasant kitchen smoke.  Cover it with foil, making sure to tuck in all the edges and smoosh it against the cup sides.  DO NOT put cooking spray on the foil...the bacon will slide down the sides.


Next, you cover the cups with bacon.  I only had enough to make four cups and that's all I needed anyway.  One think I noticed while closely inspecting the *nice* bacon cup picture, the strips look more narrow than mine.  I really don't think I had fat bacon...fatty maybe but not fat.  I think they trimmed the strips to be more narrow, making it easier to fit more strips (aka the sneaky things they do to make the photos look better).

Start by laying one strip over the top, trimming to fit.  Then, place another one crossways over that to make a +.   Measure one strip to go around the cup and trim.  Weave in and out of the crossed bacon.  Using a regular muffin pan only allowed me to do this step once.  I thought I'd be all clever and put a piece of trimming in the middle to give it more bacony heft...not a stellar idea as those bits were the first to brown too much.


Cook in a 400 degree oven until bacon reaches the desired level of crispiness.  The recipe said 10-15 minutes....I kept this in for 25 minutes, and it still needed a few more minutes.  I don't take kindly to bacon blubber...must be crispy at all times.  I turned the pan a few times to make sure it was browning evenly.  You will get a few overly browned edges if they are sticking out, so check a few times to see if you need to tuck them in.  Let the bacon rest/cool for about 5 minutes to set up before removing it from the pan.  I used a knife to gently loosen any stuck edges.


And the results were quite nice, if not as exquisite as the recipe photo.  Only *I* had a problem with that....being the perfectionist that I am (oh the curse!)   The cups were filled with scrambled eggs made with fresh hen eggs, dotted with a bit of butter and pepper,  and the guys loved them.  How could they not???  It's BACON for pete's sake!!   It would be nice to sprinkle a little grated cheese on the eggs, if you want.  That was the plan but I was so elated that it was actually coming together...well, I forgot.   (on the side is a homemade biscuit with bacon gravy and that's a post for another day)


Moral of the Story~

Don't be afraid to try a new recipe...go for it!   But there may be a misprint or the instructions incomplete.  It's a good idea to do a test run first!  And remember....